[ad_1]
![]()
Until you begin with a pile of tubing, all-new components and a ravishing thoughts, your common garage-built bike comes collectively one piece at a time—and it’s not all glamorous. We’re zeroing in on our imaginative and prescient of a purposeful hoonmobile, however our Honda CB550F Tracker has some unfastened ends to handle in type and performance earlier than it finds its stride.
Right this moment’s program is actually 5 minutes of fame for the nitty-gritty work we typically overlook within the ultimate product. Tedious, however important in our revival, our work on this phase contains squaring away our problematic entrance fender, finalizing the match of our aftermarket seat, some detabbing and changing our wheel bearings with fundamental instruments.
Fixing the Fender Dilemma If you happen to’ve been following together with our CB550F Tracker undertaking, the entrance fender was the one largest problem I had with the way in which this bike was progressing. Our inventory tin fender was pitted and dented, and the radius didn’t play properly with our bigger Bridgestone Battlax AX41 rubber.
That stated, we would have liked some form of fender, not just for performance to appease the feedback part, but additionally as a result of the bike wanted some visible weight out entrance. We mocked up a number of completely different tin models, plastic dust bike fenders and even performed round with the thought of a fork brace earlier than we dedicated to modifying our beat-up stocker.
I began with some tape strains to visualise my cuts, and I lower each ends off the fender so I may weld them again on to protect the wired edge. I guarantee you, this makes all of the distinction within the ultimate product, because the uncooked lower edge simply gained’t lower it up shut.
After becoming and refitting our items, we made the fender complete once more with our TIG welder on low amps and welded it inside and outside. I dressed it with varied abrasive instruments, used a hammer and dolly to excellent the form and completed it off with a mixing wheel on an angle grinder. Whereas the chrome on the fender continues to be fairly hit, and you’ll see the labored space up shut, the entrance finish of our CB lastly seems to be proper to my eye.
![]()
Becoming a Common Aftermarket Seat The precise seat could make or break your construct, and except you’re crafting it from scratch, you’ll don’t have anything various images and measurements to base your buy on. We partnered with Tuffside for our construct, and Chris despatched over one in all his Common Road Tracker seats with our desired upholstery and mounting areas for the CB550.
We may have made issues simple on ourselves, as Tuffside presents a direct-fit model of this seat for the CB550. However since there are only a few direct-fit seats in the marketplace for these previous bikes, and we don’t worry the cutoff wheel, we opted for the common possibility—which is available in at a sporty 26-inch size.
There are many methods to make a seat match, and you’ll go so far as constructing an entire new rear hoop for those who like, however within the everyman spirit of our CB550, we determined to take a easy and pragmatic strategy. I’ve mocked the seat a number of occasions and addressed the battle areas as they arose, beginning with the inventory seat’s hinges, and transferring on to different tabs, helmet holders, and many others. At that time, the seat match loosely on the bike, however the body wanted additional modifications to tighten up the match.
The CB’s inventory seat help was stopping our Tuffside seat from becoming tight towards the body, and we’d have been properly inside our rights to trash it, however I opted to transform it as an alternative. I lower the help off the place it met the body, and bolted it to our Tracker seat to find out how a lot additional ahead it wanted to be.
With that location decided, I added some materials to the entrance of the seat help so it matched the angle of the tail on our Tracker seat and burned it in. Certain, you may make a trick new piece from scratch that appears higher, however apart from in your Instagram account, it gained’t be seen.
The opposite battle space I bumped into was up entrance, the place a inventory gusset/mounting location was stopping the seat from becoming tightly towards the gasoline tank. I needed to trim a major quantity of the gusset off to get it excellent, so I made a brand new gusset on the underside facet so as to add energy and provides the seat tab some extra meat to seize on.
![]()
All stated and accomplished, the seat mounts with nothing greater than the entrance tab and two bolts by means of inventory holes on the CB’s seat help bracket, that are hid by the upholstery. Lastly in a position to climb into the saddle, we discovered the texture of our new Road Tracker seat to be wonderful, virtually OE high quality. There’s no give or shifting from poor fitment, and the underside of the seat follows the road set by the gasoline tank completely.
![]()
Trimming Tabs Detabbing a body is a vital a part of any customized bike, as nothing distracts out of your new cosmetics fairly like a rapidly welded tab for a passenger peg from the Seventies. That’s the precise piece that was the largest eyesore on our body, because the tab was large, pointless and cluttered the swingarm space on our tracker.
![]()
There’s no must overcomplicate this process, however loads of trigger to be protected about it. You need to keep away from reducing or grinding into your body tubes just like the plague, as the ultimate outcome will probably be an unpleasant gouge you’ll need to fill.
Begin with a cutoff wheel to take away the tab utterly, however depart the weld space on the body. From there, transfer on to a grinding disc or flap wheel to take off the weld, however hold your disc centered on the weld itself, and save the mixing for the tip.
![]()
You probably have the means, a tube sander will get you the most effective end attainable with out gacking your body, and we completed ours with an affordable model and a well-used 80-grit belt. There are nonetheless different tabs on our Honda CB550F Tracker that must go, however I’ve been eradicating them solely as wanted, since some could also be reused.
![]()
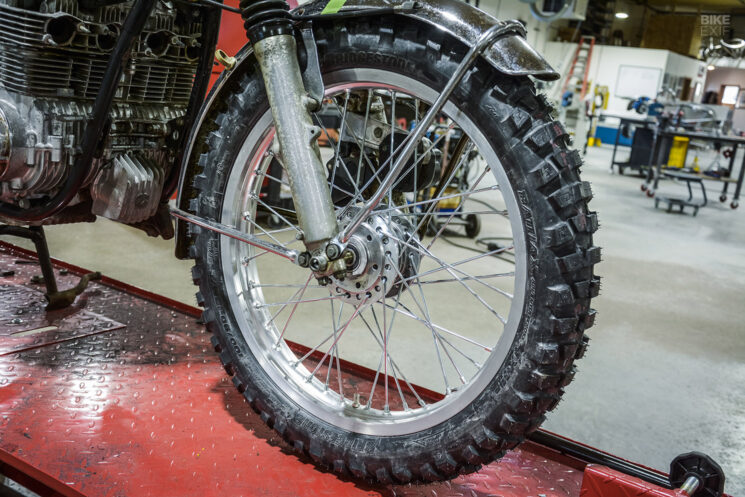
Changing Wheel Bearings With Primary Instruments Name it an irrational worry, however the considered unique wheel bearings failing used to at all times linger in my thoughts whereas within the saddle of a not too long ago revived bike. Fortunately, that by no means occurred, however there’s no cause to trip on OG rollers in case your bike is something like our Honda. We have now a 20-ton press and fancy bearing pullers across the store, however for the sake of precept, I vowed to make this occur with common hand instruments.
We grabbed a finances sealed-bearing and seal equipment from 4INTO1 for $27 to get began, containing the whole lot we would have liked entrance and rear. On our Honda, each wheels have the bearings pressed in with a spacer within the center and a thread-in retainer on one facet.
Beginning with the entrance wheel on the retainer facet, you’ll discover a sequence of peens, or stakes, that hold the retainer from unthreading. Utilizing a ⅛-inch drill bit, drill barely into the stakes to clear them, and warmth the hub for a number of minutes with a warmth gun. Whereas there are faster methods to warmth and increase the hub, warmth weapons are readily accessible, and are a safer possibility for any floor remedies in your components.
With the hub scorching, I’ll use a punch to get the retainer spinning, and a pair of pliers to take it the remainder of the way in which. After that, we’ll flip the wheel over on the bench and begin heating the alternative bearing. As soon as it’s scorching, we flip again to the retainer facet and use a punch to shift the middle spacer to at least one facet so we will hit the bearing’s internal race to drive it out. If you happen to’ve used ample warmth, the bearing gained’t take a lot convincing.
It’s the identical course of for the retainer facet, besides that we will take away the middle spacer utterly to get it out of the way in which. Some hubs might have notches within the bearing seat across the outer race which you can get a punch on, however our Honda didn’t.
Elimination of the rear bearings is finished in the identical trend, however our CB550’s rear put up extra of a battle. The tabs that maintain the middle spacer in place have been stronger, and it took extra power to get the spacer shifted over. Additionally, the retainer-side bearing has a metallic bushing in it that you just’ll need to work round, and the retainer itself is a bit tougher to take away. I used a device we welded up years in the past, however you can too faucet two of the holes to simply accept an M6 bolt and use a pry bar to spin the retainer out.
![]()
If you happen to’ve made it this far, putting in the brand new bearings is simple. Our solely phrases of warning are to make sure you have the tabs in your middle spacers bent excellent, and to bear in mind that some bearings don’t have a seat and could be pushed too far into the wheel. Additionally, it takes some doing to get your new bearings put in by hand. A press would simplify this drastically, however a liberal utility of warmth and a few faucets with a brass drift on the outer bearing race will get you there.
![]()
Unsolicited Ultimate Ideas To most, I’m certain our CB550 Tracker seems to be the identical because it did on the finish of our mockup section in Half 3, however I can guarantee you it is a utterly completely different bike. The wheels are new from the within out, the suspension works now (higher than new) and we’re honing in on the ultimate imaginative and prescient of our go-anywhere hoonmobile.
That’s what this bike is all about for us, proving what anybody can do with a bit know-how, some fundamental instruments and an affordable previous bike. All of it begins with the massive items and ends if you’ve chiseled away the whole lot that isn’t David.
![]()
Bike EXIF thanks Motogadget, Tuffside, Bridgestone, Lowbrow Customs and Biltwell Inc. for supporting our Honda CB550F tracker construct.
[ad_2]