
[ad_1]
As an Amazon Affiliate DirtBikePlanet.com earns from qualifying purchases.
I’ve spent the final week deciding how I can arrange my dust bike trailer in order that I gained’t need to spend quarter-hour strapping down all of our dust bikes every time. I desire a strapless resolution that will likely be straightforward and safe.
There are dozens of merchandise on Amazon and elsewhere which have been invented over time, however all of them appear to have gone out of enterprise. There simply isn’t one clear winner.
Nevertheless, I’ve discovered an answer that works very well for me. I safe the entrance wheels with these AMAZING clamping wheel chocks (out there on Amazon.com), and I clip ties to my foot pegs. This methodology permits me to safe my bike in beneath 30 seconds, and I’ve no fears at all the bike coming free in transport.
This resolution has confirmed to be far superior to utilizing tie-downs and strapping my bike every time. Ties put stress on the forks and tend to put on by means of fork seals. This methodology places no stress in any respect on the forks so it’s higher for the bike, and I might argue is safer.
The Wheel Chocks I Use
I spent a whole lot of time searching for the best wheel chocks. You may get actually low cost wheel chocks on Amazon that principally simply present a slight stabilization to the entrance wheel whenever you roll it in, however they don’t accomplish a lot. You continue to need to strap the bike down.
An alternative choice is the kind of wheel chocks the place you roll the bike in and the chocks barely cup the wheel. Whereas this offers slightly extra stabilization, it has the identical downside. You continue to need to strap down the bike. The chock solely holds the bike regular for you as you strap it down. For my part, this isn’t even value having.
Then, I went to purchase a trailer from a man on Craigslist who turned me on to these superior wheel chocks. They’re taller than regular chocks and so they have a bit which comes excessive of the wheel to lock it in place. You push the bike ahead into the chock after which lay the highest piece over the tire, which grips the tire and doesn’t let it roll backward. They’re actually nice.
One other factor I like about these chocks is that they arrive in two completely different sizes. One dimension is for smaller bikes with 14-17″ wheels, and different for full-size 19-23″ tires. This works completely for me as a result of I’ve two children bikes: a 50cc dust bike for my 6-year-old, and a 110cc dust bike for my 8-year-old. Technically 50cc dust bike is just too small for the chocks to work appropriately, however I nonetheless use it as a technique to assist the entrance tire and I take advantage of the foot peg ties to safe the bike.
Some folks use these chocks alone with out every other assist, and have good outcomes. I even heard from a man that drove cross nation with none downside utilizing solely these chocks.
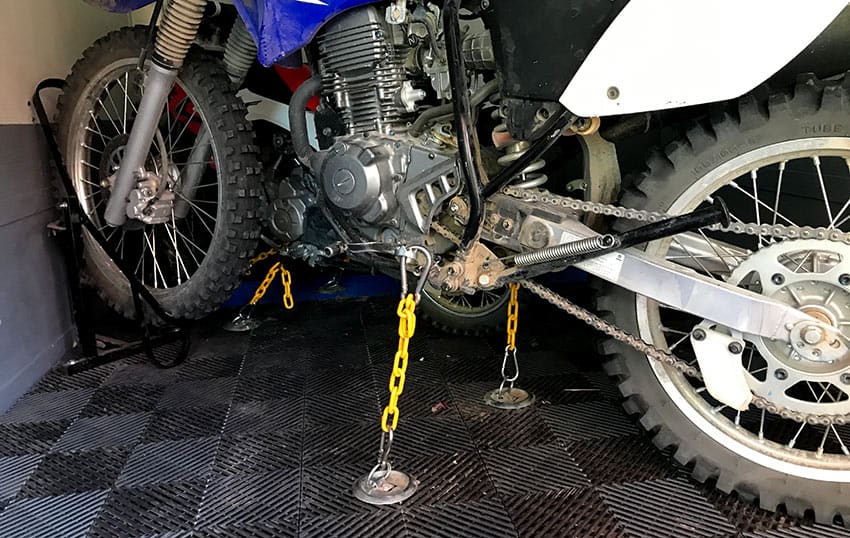
Nevertheless, I additionally heard from a man who as soon as had a motorbike work its means free utilizing the chocks. It was only one time in 5 years of use, however his expertise was sufficient to persuade me to make use of a belt-and-suspenders strategy. So now I roll the entrance tire into the chocks, after which I connect a brief bungee to my foot pegs. With this technique, I really feel prefer it’s principally inconceivable for something to occur to the bikes whereas in transit.
Securing the Foot Pegs
By attaching some kind of tie to the foot pegs, you retain the bikes from rolling again out of the chocks. This might actually solely occur if you happen to hit a sequence of bumps and by some means the bike labored itself free, nevertheless it’s good to make sure your bike is safe.
There are a couple of methods to do that. All of those strategies connect to the ground of your trailer, after which clip onto the foot peg.
- A brief rubber bungee attaches to the ground of the trailer on one finish, and on the opposite finish it clips onto the foot peg
- A brief metallic chain secured to the ground on one finish after which on the opposite finish, a carabiner hook just like these (Amazon hyperlink) that clips onto the foot peg
- A metallic flip buckle (Amazon hyperlink) related to the ground on one aspect, and clipped onto the foot pegs on the opposite finish
- A trampoline spring (Amazon hyperlink) connected at one finish to the ground and the opposite finish to a carabiner that clips onto the foot peg
- A carabiner connected to the ground of the trailer, after which a easy webbing loop (Amazon hyperlink) that goes from the carabiner by means of the foot peg, after which the opposite aspect loops again to the carabiner.
All of those options will work simply effective for securing your foot pegs. If you do that venture, take into account that the size of the connection doesn’t actually matter. You don’t have to fret in regards to the chain (or webbing or trampoline spring, and so forth) being exactly the proper size. If it’s lengthy sufficient to achieve the foot pegs from the bottom, you’re okay. You’ll need this connector to be connected to the bottom in entrance of the foot pegs, so you may set the angle in accordance with the size of your connector.
You could be questioning how one can join the chain, flip buckle, or webbing loop to the foot pegs since these connectors don’t have any “give” in them. You’ll merely lean over your bike to compress the forks and join the ties, then whenever you get up, the forks can decompress to their full prolonged peak. So the forks are compressed as you’re connecting, however then they aren’t compressed in any respect throughout transport or storage. Excellent!
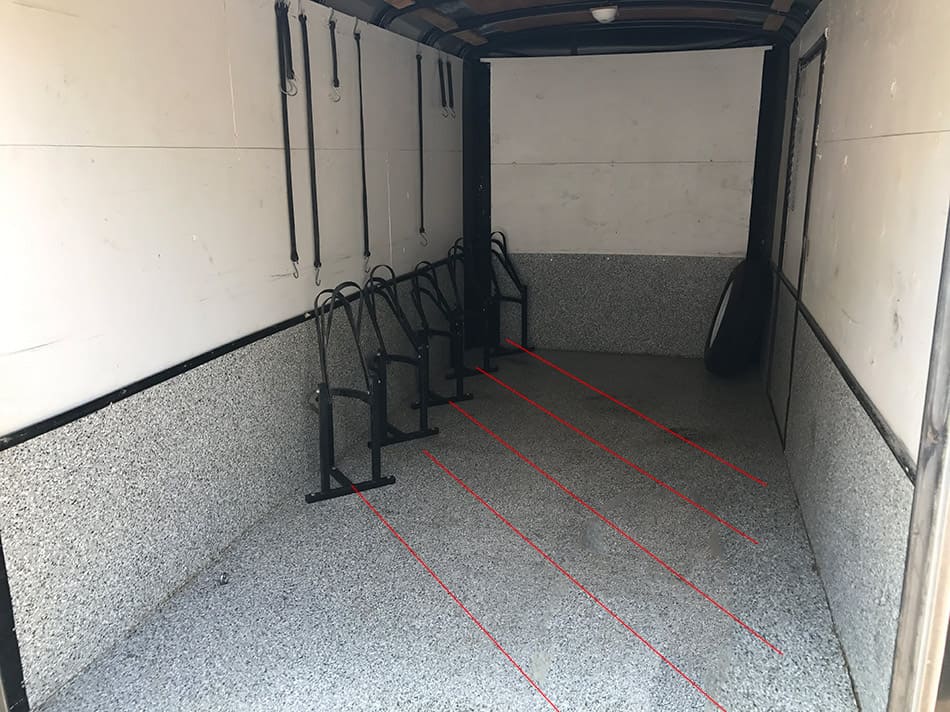
Placing this System Right into a Grime Bike Trailer
When you’ve learn my article on selecting the correct dimension of dust bike trailer, you’ve gotten already seen images of this technique in use. The wheel chocks simply go off to at least one aspect of the trailer and the bikes are loaded at an angle. This maximizes your cupboard space within the trailer, and retains the wheel chocks out of the best way as you stroll round.
[ad_2]